When setting up the Credit and collections module in your D365 Finance environment, you will want to ensure that your collections team will have access to work with their assigned customers. Logging in and seeing all of the Customers with all of their information can be an overwhelming experience, making it more difficult for your collections team to do their job. D365 Finance allows for the creation of Collections agents with the ability to filter only assigned information.
Collections Team
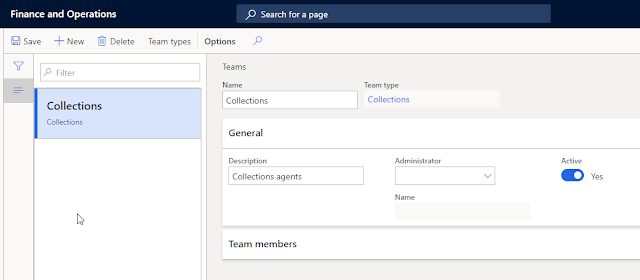
The first step in setting up Collections agents is to create a Team for your Collections agents. Teams can be set up at Organization administration > Organizations > Teams. It is here where you can define Teams of type Collections or Employees. You can also assign a Team administrator and define whether or not the Team is active.
 |
| Set up a Collections Team |
The Collections Team will then get assigned within Credit and collections parameters. If a Collections Team is not created and you begin creating Collections agents, a default Collections team will be created and assigned in Credit and collections parameters.
 |
| Assign the Collections Team in Credit and collections parameters |
Collections Agent Setup
Navigate to Credit and collections > Setup > Collections agents. NOTE: your collections workers will first have to be set up as Workers in the Human resources module.
Click New to create a new Collections agent. Here, you will be given a list of workers that you can search by Name or by Skill.
 |
| List of Workers available to select as Collections agents |
Once you have selected your worker, you can click Add to add them to your list of Collections agents.
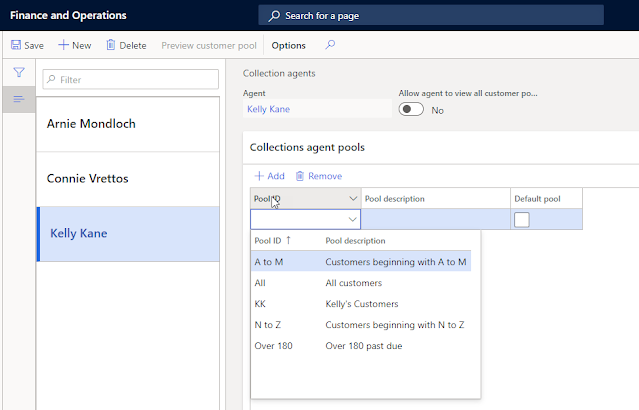
You will see that you can add a Collections agent pool to the Collection agent record that was just created. These pools are not in the system and will have to be defined based on the criteria required by your business.
 |
| New Collection Agent |
Customer Pools
Customer pools are used to break Customers down into definable groupings that can then be assigned to Collections agents.
Navigate to Credit and collections > Setup > Customer pools to begin defining the Customer pools for your collections team.
When creating a new Customer pool, there are two types of pools that can be selected. One is a Collections pool, and the other is an Aging snapshot pool. The Collections pool is what is used to filter the information that your Collections agents see on their list pages and Workspaces. The Aging snapshot pool can define reporting and Workspace views related to aged balances.
Once the framework of your pool is created, you can then enter specific criteria to aid in the filtering process. Click on the link to Select pool criteria. This will open a Query screen that will allow you to use Queries and Filtering to define your Customer pools.
Once you have selected your criteria, you can go back to the Customer pool and preview the Customers that will be shown when this pool is selected. In the example below, only Customers who begin with the letters A-M will be shown when this Customer pool is employed.
 |
| Preview customer pool |
Customer pools are a strong tool to aid your Collections department in division of responsibilities and can be created using a large number of Customer related fields in the system.
Collections Teams Continued
Once all of the above steps are completed, you can view the Collections agents in the Team you created for the Credit and collections parameters.
At the team level, you can also add new members to the Team and apply advanced date filters to your view. Likewise, you can create a Team leader or add an expiration date to the Collection agent's record if their work in Collections is only temporary.
 |
| Team members have been added to the Collections team |
Customer Pools in the Credit and Collections Workspace
 |
| View Customer Balance status by Customer Pool |
 |
| View Collections list pages by Customer pool |


No comments:
Post a Comment