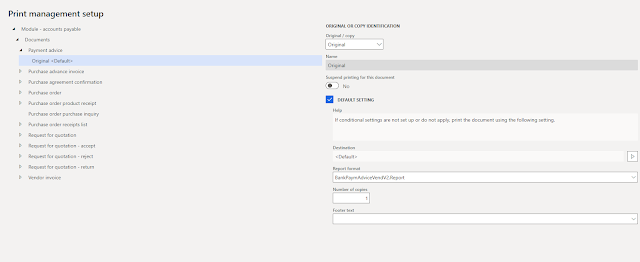
One of the pain points in AX/F&O was that you could not set up batch processing for your Payment advice reports.
In late 2019/early 2020, a new feature was added called "Enable batch processing for bank payment advice reports."
The description reads as follows:
This feature lets you use batch processing for both the customer and vendor bank payment advice reports. To use this feature you must use BankPaymAdviceVendV2 and BankPaymAdviceCustV2 bank payment advice, and set them up as the customer and vendor report formats in print management.
How do we set this up and use this functionality? In our example today, we will look at this from an Accounts payable/Vendor perspective.
Enable Feature
 |
| Click on the workspace called Feature management to get a list of new releases! |
 |
| Enable the feature to start the process |
Set up Print management
 |
| Accounts payable Print management document list |
 |
| Payment advice is now available to setup! |
Set up print management for a module | Microsoft Docs
We will return to this in a moment. There is a little bit more setup that needs to be done on the Vendor.
Vendor Email Setup
On the Vendor record, set up Contact information for the remittance email. While there, select Edit contact information (as seen below):
 |
| Add a Vendor email under Contact information |
Here, you can identify a Purpose for the specified record.
 |
| Select a purpose for the record |
In my example, I selected Remittance. This will be important later!
To set up Purposes, navigate to Organization administration > Global address book > Address and contact information purpose. Here, you can set up purposes and assign to the Address or Contact information associated with your Customers and Vendors.
 |
| Address and contact information purpose form |
Set up Print management
Back to Print management, open the Payment advice document from the Document list. Under Destination, click the arrow key (looks like a Play button from a cassette player) and select Printer setup.
 |
| Enter the Destination settings |
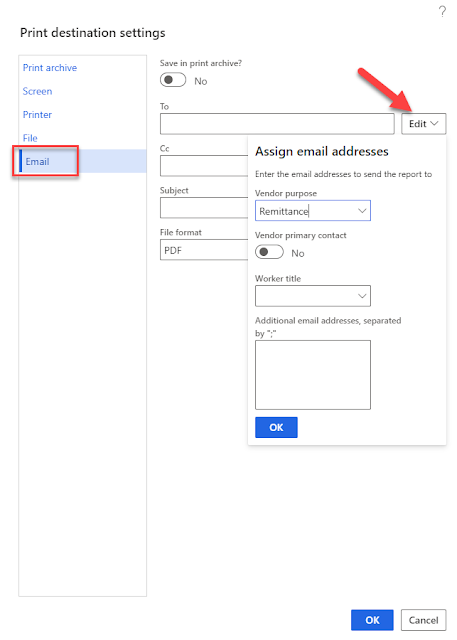
When opened, this is where the configuration of the Print destination settings occurs.
Select Email, if choosing to email. Prior to being able to send emails, the SMTP settings must be configured in your environment. In the To field, select Edit. This is where you can select the Vendor purpose that was assigned on the Vendor's Contact information. You can also select any CC'ed email addresses you would like to have the Payment advice go to, as well as define a subject and file format.
 |
| Assign Vendor purpose to automatically send emails to the same email type! |
Your finished Print destination settings for the Payment advice may look something like this when complete.
 |
| Configured Print destination settings |
Notice that the To email is listed as @Remittance@. The use of the @@ is going to dynamically pull in the email address listed as the Remittance address on the Vendor's contact information!
Within Print management for Payment advice, ensure that the Report format is set to BankPaymAdviceVendV2.Report.
 |
| Select BankPaymAdviceVendV2.Report under Report format |
Setting up Batch processing
When generating your Payment advice, you can select Use print management to generate an Email to your Vendor using the Print management parameters we specified above.
 |
| Select Use print management to use email as set up |
In order to set up Batch processing, first, generate a Payment advice. Once there is a Payment advice associated with the Payment journal, navigate to the Print dropdown, and select Payment advice.
 |
| Select Payment advice from the Print dropdown |
This will allow you the option to generate the Payment advice and/or set up Batch processing.
First, set the Use print management slider to Yes under Parameters (1).
In order to set up batch processing, open the Run in the background FastTab on the report generation form. Then, set the slider under Batch processing to Yes (2). You can set up the Recurrence and any Alerts (3) you wish to see as well from this form. Once completed, click OK to begin generating the payment advice in batch.
 |
| Payment advice batch processing parameters |

No comments:
Post a Comment