Setup - Bank Account
There is some preliminary setup that needs to be done on the bank account for NSF functionality to work. Navigate to Cash and bank management > Bank accounts > Bank accounts. Open the Bank account where you receive customer payments.
There, in the Payment management FastTab, you can mark a specific charges group and the name of the payment journal type you want to use for NSF payment reversals.
 |
| Updating the bank account for NSF transactions |
Setup - NSF Fee
Setting up a Charges group for your NSF payments will allow you the flexibility to charge a fee for any payment that comes back from the bank as having not-sufficient funds.
First, you will want to set up a Charges code. You can find Charges codes at Accounts receivable > Setup > Charges setup > Charges code.
Second, you will want to set up a Charges group. Charges groups get set up at Accounts receivable > Setup > Charges setup > Customer charge groups. This is what gets defined on the bank account.
 |
| Create an NSF Charges group |
Then, you will want to set up an Auto charge. Auto charges get set up at Accounts receivable > Setup > Charges setup > Auto charges. Here, you will want to define if the charge will occur at the header or line level. Set the Account code to Group and assign the Customer charges group that you created to the Auto charge. Then, in the Lines section, select the Charges code you created and define the amount you want to charge when a customer has an NSF payment.
Additionally, there are reasons codes that are required when creating NSF payment reversals. These reason codes can be found under General ledger > Journal setup > Financial reasons.
When setting up a reason code for NSF, you will have to select both Bank and Customer for the reason code to show up on your NSF transaction.
Now that the setup is complete, you will want to mark your payment as NSF and apply the reversal of the payment to the Customer account.
First, on the Customer record, navigate to the Collection tab in the ribbon to open the Collections page for the Customer.
Once on the Collections page, find your payment transaction, select it, then click NSF payment.
 |
| NSF Auto charge setup will add a charge to a Customer's account when NSF occurs automatically |
Setup - Reason Codes
Additionally, there are reasons codes that are required when creating NSF payment reversals. These reason codes can be found under General ledger > Journal setup > Financial reasons.
When setting up a reason code for NSF, you will have to select both Bank and Customer for the reason code to show up on your NSF transaction.
 |
| Financial reasons used for NSF need both Bank and Customer selected |
Mark Payment as NSF
Now that the setup is complete, you will want to mark your payment as NSF and apply the reversal of the payment to the Customer account.
First, on the Customer record, navigate to the Collection tab in the ribbon to open the Collections page for the Customer.
 |
| Navigate to the Collections page on your Customer record |
Once on the Collections page, find your payment transaction, select it, then click NSF payment.
 |
| NSF payment on the Customer's Collections page |
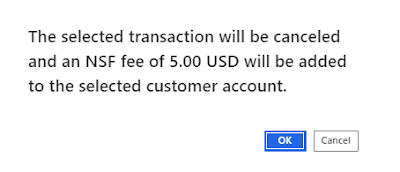
You will get a pop-up stating that you are going to add the auto-charge we created above to the Customer account.
 |
| NSF fee being added to the Customer account |
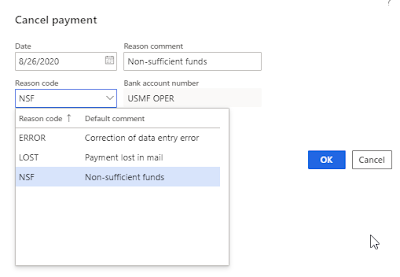
Next, you will select the NSF Reason code we created above (Financial reasons).


No comments:
Post a Comment